Share Directory Between GNU/Linux Guest and GNU/Linux Host
This section will guide you on how to share a directory between a GNU/Linux guest and a GNU/Linux host using virt-manager. Enable the smoothly file sharing between the host and guest virtual machines. So you don't need to trubleshoot the network connection or install additional software to share files between the host and guest virtual machines. like cloud storage, lan sharing or bluetooth sharing.
Prerequisites
Before proceeding, you should already have a virtual machine set up. This guide will not cover the process of creating a virtual machine.
Step 1: Adding Filesystem Hardware
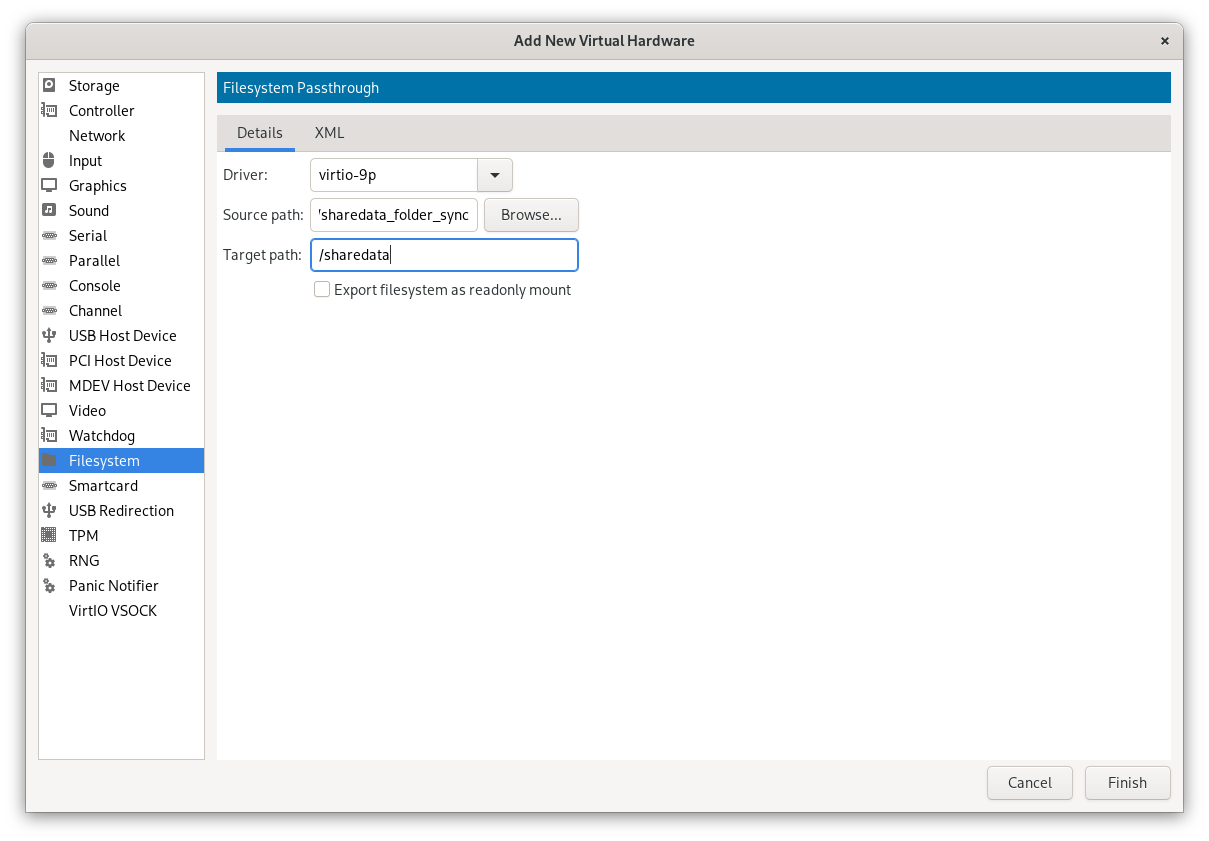
- Open the settings for your GNU/Linux virtual machine in virt-manager.
- Inside the settings, select
Add new Hardware. - Choose
Filesystemas the hardware type; this is what we will use for file sharing. - Configure the following options:
Driver: Selectvirtio-9p.Source path: Choose the directory containing the files you want to share.Target path: This is the mount point you can name as you prefer. you also need to enter this name in vm.
- Once you've configured these settings, click
Finishto add the new hardware.

Step 2: Creating a Shared Directory in Your Virtual Machine
Before you can access shared files in your virtual machine, you need to create a directory to serve as the mount point. Here's how to do it:
- Boot up your virtual machine.
- Open a terminal in your virtual machine.
- Create a directory called
shared(you can choose a different name if you prefer):
mkdir shared
Step 3: Mounting the Shared Folder
With the shared directory created in your virtual machine, you can now mount the shared folder using the following command:
sudo mount -t 9p -o trans=virtio /sharedata shared
This command mounts the specified mount point /sharedata to the share directory named shared within your virtual machine. The -t 9p option indicates that it's a virtio-9p filesystem.
To verify that the shared folder is mounted correctly, you can use the lsblk command:
lsblk
You should see the shared folder listed in the output.
Step 4: Automating the Mount Process
To speed up the process of mounting the shared folder, you can automate it by adding an entry to your fstab file. So you don't need to mount the shared folder manually every time you boot up your virtual machine.
fstab Configuration
In GNU/Linux, mounting configurations are managed through the fstab file.
sudo vim /etc/fstab
Add the following line to auto-mount the shared folder:
/sharedata /home/<username>/shared 9p trans=virtio,version=9p2000.L,rw 0 0
Replace <username> with your actual username. Save and exit the file.
Final Step: Reboot Your System
Now, reboot your system, and you should see the /sharedata folder automatically mounted on your system.